
How To Make A Gumpaste Magnolia | Sugar Flowers
There are many varieties of magnolia, but the hybrid Soulangeana Magnolia - commonly known as Saucer, Chinese or Tulip Magnolia, is one of the most striking.

With large beautiful white and pink petals and a centre that has golden tones. With such a stunning look, this flower is a show piece on top of any cake.
Equipment Required For This Magnolia Flower
Tools

18G-gauge florist wire – For the stem
26G gauge wire white florist wire – For the petals
CelBoard (groove board)
Ball tool (plastic or metal is fine)
Rolling pin (6” or 9”)
Florist tape in deep green & brown
Foam petal/flower former (or alternative former made from a glass cup and foil)
Paint brushes - For edible glue and dusting petal dusts
Something to insert your flower into as you work – Such as Styrofoam/cake dummy or florist foam blocks (Oasis).
Edible Ingredients
Petal dust - Colours according to the colour of the flower you do.
Edible Colour paste/gel colour - If you colour your gumpaste.
Corn flour/Corn starch – To prevent gumpaste from sticking.
Trex/Crisco (Vegtable shortening) – For conditioning gumpaste.
How To Make This Gorgeous Flower
Stem, Carpel/Stamen

Carpel/Stamen, Bud for slightly open flower, Unopened buds
Take an 18-gauge florist wire, cut it into half.
Use some pliers to create a small hook on the end. This is for the central stem for the flower/slightly open flowers
Use edible colour paste/gel colour, to colour up some some gumpaste to pale green shade.
Roll the pale green gumpaste into a size of about 1.5 cm - 2 cm in diameter.
Take the 18-gauage wire and brush some edible glue onto the hook end.
Put the hook end into the gumpaste, secure the gumpaste to the wire at the base.
Between your fingers, gently shape and pull the gumpaste into a soft point. The overall shape will look like a tear drop.
Use a small pair of scissors, starting at the base, begin to cut small snips into the pale green gumpaste, row by row. Staggering each row you cut, so the snips alternate in each row. Do this until you reach the tip (see the video, if this is a tad confusing, it is much clearer to see visually).
Use your fingers to gently curly back each snipped section. This is called the ‘Carpel/Stamen’, part of the flower.
Leave this to dry before dusting. Place it into your cake dummy or polystyrene, while it dries.
Buds - For Slightly Open Flower
Do the same process in steps 1 & 2 for the stem, carpel/stamen with the 18-gauge wire.
Roll some white gumpaste into a size of about 1.5 cm - 2 cm in diameter.
Take the 18-gauge wire and brush some edible glue onto the hook end.
Put the hook end into the gumpaste, secure the gumpaste to the wire at the base.
Between your fingers, gently shape and pull the gumpaste into a soft point. The overall shape will look like a tear drop.
I made two buds - You can choose to do the same or make one or more.
Leave buds to dry. Place it into your cake dummy or polystyrene, while it dries.
Unopened Buds
Do the same process in steps 1 & 2 for the stem, carpel/stamen with 24-gauge wire.
Roll the pale green gumpaste into a size of about 0.5 cm - 1 cm in diameter.
Take the 24-gauge wire and brush some edible glue onto the hook end.
I made 4 unopened buds in various sizes - You can choose to do the same or only make 1.
Leave buds to dry. Place it into your cake dummy or polystyrene, while it dries.
Small - 3 Petals

Small Petals
Use 26-gauge white florist wire, cut into 3. It helps if the florist wire is white, so it does not show through the petals.
Use the celboard and dust with corn flour, to ensure gumpaste does not stick.
Roll out some white gumpaste over the smallest groove. The petals on this flower, are quite fleshy/thick. Make sure to roll out the gumpaste to represent this, so do not roll out the gumpaste too thinly.
Use the smallest cutter, cut out a petal over the groove line. Do this two more times, so you have a total of 3 petals in this size.
Brush some sugar glue over the one end of the 26-gauge wire.
Support the petal between your thumb and index finger, then gently thread the glued end of the 26-gauge wire into the raised groove.
Place the petal onto a foam pad and run a ball tool around the edge of the petal.
There are 4 methods you can use to vein the petal:
If you have a magnolia silicone veiner, then vein the petal using this.
You can use a skewer to gently pass it over the surface veins to the petal.
A veining tool is more controlled than the skewer, but the technique is the same, simply pass the tool over the surface of the petal to create the vein detail.
I used a JEM Petal Veiner tool. When rolled across the petal, it leaves a texture across the surface. Do this for the back and front.
9. On the backside of the petal, run a ball tool on the inside edge of the petal. When turned the right way round, the petal will fall gently downwards.
10. Place the petal wrong side up onto a petal former. Push the base of the petal into the petal former, so it is curved leave it to dry.
If you do not have a petal former, you can make an alternative former, using a glass cup with foil that has been curved, then placed over the cup. Push the wire into the foil and allow the petal to dry.
Complete this process for all 3 petals.
Mid Size - 3 Petals

Mid-size Petals
The mid size petals are prepared in exactly the same way as the small petals from steps 1 - 8.
On the right side of the petal, run a ball tool on the inside edge of the petal.
Place the petal right side up onto the petal former. Push the base of the petal into the petal former, so it is curved leave it to dry.
Large Size - 3 Petals

Large Petals
The large size petal are prepared in exactly the same way as the small petals from steps 1 - 8.
The large size petal is then finished in the same way as the mid size petals from steps 2 & 3.

3 petals required for each size petal
Petals - Slightly Open Flower - 3-4 Petals

Slightly open flowers, two variations
Using the small petal cutter, cut 3-4 petals. Put the petals away in a zip lock bag, so it gives you time to work on each petal.
Place the petal onto a form pad, use a ball tool to thin the edge then vein one side only. Run the ball tool around the inner edge.
Brush edible glue around the base of the non-veined side of the petal.
Take the white bud that you made earlier (make sure the bud is completely dry), attach the petal to the bud with the veined surface facing outwards. It makes it easier to turn the bud upside down as you attach the petals.
Prepare all the other petals in the same way.
Attach each petal, so they overlap at the based, before attaching it to the bud.
The tighter you curl the petals in, the more closed your flower will be be. If you want the flower to be more open, widen the opening of the petals.
Leave the flower to dry upside down.
I made 2 variations of this style flower, one slightly open, one slightly more closed.
Leaves - No Cutter

Take some gumpaste coloured brown and green. Roll out each colour.
Take the rolled out green gumpaste, place it on top of the rolled out brown gumpaste. Roll them again, this will help to fuse these 2 colours together. No edible glue is required.
Use a scalpel, cut the leaves freehand. My largest leaf was 3” length x 2” width, the next leaf 2.5” length x 2” width, smallest leaf 1.5” length x 1.5” width.
Use a veining tool to add the vein lines on the leaves.
This leaf is quite thick, so there is no need to use a groove board. Brush a 22-gauge or 24-gauge florist wire with sugar glue. Gently push the wire into the leaf, ensuring you hold the leaf gently between your fingers.
Position the leaf into a petal former, make sure you give it some shape and it is not lying flat. Allow it dry, before dusting.
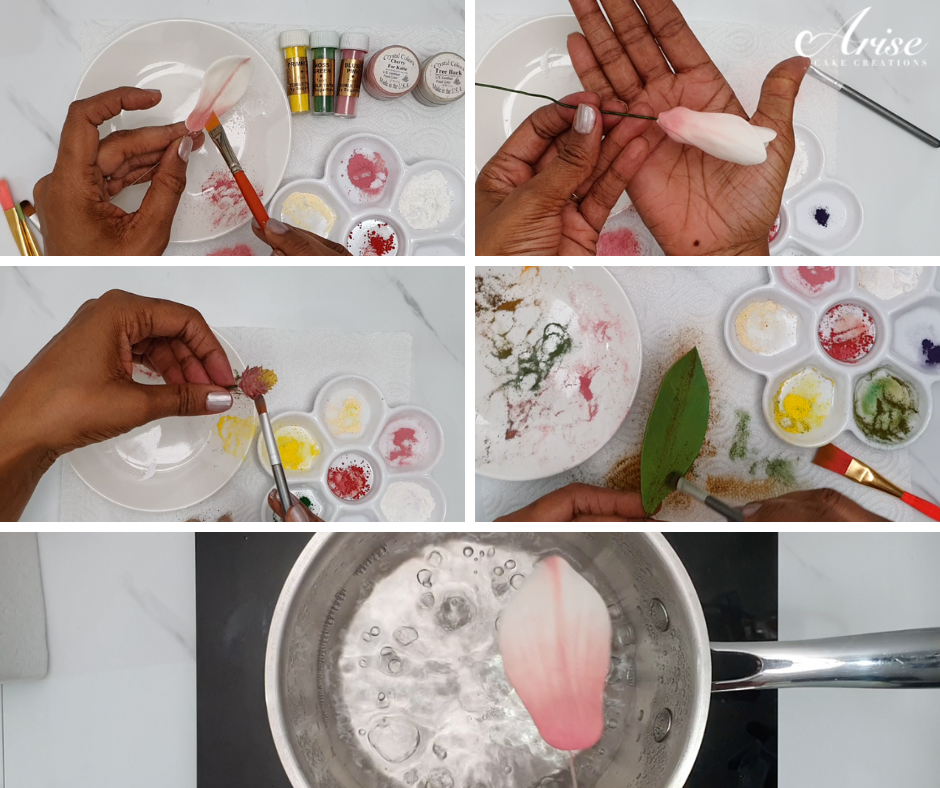
Dusting Petals, Flowers Buds & Leaves

Equipment and edible petal colours for dusting the petals
I used a selection of Sugarflair petal dust colours in: Primrose Yellow, Egg Yellow, Moss Green, Spring Green, Blush Pink and Crystal Colors in: Cherry For Katie, Tree Bark.
I never use petal dust colours neat from the containers. I mix corn flour into the colours, which helps the colour to look more natural and allows me to build up the colour intensity up gradually.
Individuals Petals
This species of Magnolia, has very distinctive markings. The majority of the colour detail is on the back of the petals. With a defined line going through the centre back, with small lines either side. I did a shaded ombre. Adding only a small amount of colour to the inside base & tip of the petal.
Slightly Open Flowers
I brushed darker colour at the base, blended into a lighter tone, adding a faint central line.
Carpel/Stamen
I brushed on a soft shade of yellow on the tip, then went into a stronger shade of yellow. I mixed some pink with some green and brushed this colour on next. As I went down towards the base, I intensified the pink.
Unopened Buds
I mixed some some green and brown. The smaller the bud, the deeper the shade of the green, the larger the bud, brush this colour on the base and leave the tip slightly lighter.
Leaves
For the back of the leaves, I mixed brown and orange. For the front to of the leaves, I mix two shades of green.
Steam To Secure Colour
If you have a steamer use this to secure the edible petal dust colour on the petals, flowers, leaves and buds.
If you do not have a steamer, alternatively boil some water in a saucepan. Carefully pass the petals, flowers, leaves and buds through the steam, be careful not to burn your fingers. Do not over steam them, so they are soaking wet. Place them into a cake dummy/polystyrene for them to dry.
Dust: Petals, smaller flowers, carpel, leaves then steam
Painted Leaves
The leaves, have a dominate central vein. Mix some light green edible petal dust with yellow. Use a very fine paint brush to paint in the vein lines.
Calyx For Slightly Open Flowers

Calyx for slightly open flowers
Mix up some dark green brown gumpaste. Roll out this gumpaste, use the 5 petal rose cutter, to cut out shape. Then use the smallest magnolia cutter, to cut out each shape, finish this of by cutting the shape freehand - it will look like a triangle with soft edges. Use the rough part of scouring pad to add texture to each calyx. Make 3 - 4 of these per flower.
Assembling Flower
Make sure all the petals are dry, before moving onto this stage. Have all of the petals lines up ready to be taped together.

Petals and carpel all lined up ready to be assembled
First Row - Mid Size Petals
Start with the mid size petals. Have some half width green florist tape ready.
Use tweezers, to bend the wire on the petals to a right angle.
Take the carpel/stamen (centre) and place first mid size petal in place. Stretch the florist tape to activate the glue in the tape. Begin winding the tape around to secure the first petal in place. Add the second petal and secure with florist tape, do the same for the third petal. The petals will move as you wind the florist tape on, this is fine, you can move the petals into position once you have finished.

First row added, then second row, then third row
Second Row - Large Size Petals
Repeat the process, as per steps 2 - 3 in the first row.
Last Row - Small Size Petals
Repeat the process, as per steps 2 - 3 in the first row.
Because of the way the small petals were dried, these petals will fall downwards.
Wide the florist tape down the length of the florist wire, creating the stem of the flower.
Move the petals into position, so each petal alternates between each row, so the flower can look at beautiful as possible.
This flower belongs to a tree, so you will use brown florist tape to assemble this flower together.

Large flower, smaller flowers, buds, leaves ready for final assembly
Tape brown florist tape down the stem of the flowers, leaves and buds. If you do not have brown florist tape you could use green florist tape, then dust it with brown petal dust.
Take the large leaf, bend it about 1cm - 1.5cm down the stem.
Tape the first leaf down about 2cm down the flower stem.
Tape a leaf on the large bud in the same way as step 1 & 2.
Tape on another bud - So there are now 2 buds and 1 leaf.
Use your fingers to add kinks into the wires, the way it would look naturally on a tree.
Tape a slightly open flower onto this - There are now 2 buds, 1 leaf and a slightly open flower. If you have done exactly the same quantities of flowers and buds, you will have 2 sets of these.
Tape the bud/slightly open flower sets onto the main large flower. As the flower gets heavier and more is added on, turn the flower upside down, this will make it easier to wind the florist tape down the length of the stem.
You beautiful magnolia flower is ready to be placed on your cake or used as a centre piece.

I hope you enjoyed this tutorial. If you make this magnolia flower, please remember to tag me - #arisecakecreations - @arisecakecreations on Instagram or Facebook, so I can see your beautiful work.