
Gumpaste Peony Bud & Leaves | Free Template | Sugar Flowers | Part 2
This is part 2 of the Gumpaste Frilled Oriental Peony. If you haven’t seen the blog or watched the YouTube tutorial make sure to check it out before moving onto making the peony bud(s) and leaves.
Making the peony bud(s) & leaves will complete the look of your peony flower. The peony flower definitely looks stunning on its own, but the leaves and the buds will bring the flower to life and make it look more realistic.
The FREE TEMPLATE that was used for the Gumpaste Frilled Oriental Peony, also has the calyx and leaves on it as well!
Main Equipment Required
The full list of equipment is outlined below the photo.

Equipment Required For The Peony Buds & Leaves
Tools
24 gauge florist wire (for the pistils)
18-gauge florist wire – For the stem
Ball tool (plastic or metal is fine)
Rolling pin (6” or 9” length)
Paint brushes – For edible glue and dusting petal dusts.
A glass cup
Zip lock bags/cling wrap/air tight container - Gumpaste dries quickly, so it will need to be stored away while you work.
Something to insert your buds and leaves into as you work, such as a cake dummy, polystyrene or florist foam blocks (Oasis).
Edible Ingredients
*Gumpaste - My gumpaste recipe is easy to make and great especially if you live in a hot climate.
Light Pink Gumpaste
Dark Green gumpaste
Petal dust - Colours according to the colour of the flower you do.
Edible Colour paste/gel colours - If you colour your gumpaste.
Corn flour/Corn starch – To prevent gumpaste from sticking.

Colour Your Gumpaste
Use the same colour gumpaste for your peony bud(s) petals, that was used for the main peony flower. I used Sugarflair’s Skintone colour.
Prepare The Centre

To keep the centre light weight, use polystyrene balls. I used 2 size polystyrene balls to create a mid size bud and a closed bud.
Note: You can use gumpaste to make the centre, however it will make the centre quite heavy and will take time to dry.
Note: Make sure the polystyrene balls can easily pass through the cutters you are using.
Have 4cm & 2cm polystyrene ball(s) ready.
Bend a 1.5cm hook into one end of an 18 gauge florist wire. Do not close the hook. Prepare a florist wire for the 4cm polystyrene ball and the 2cm polystyrene ball.
Making The Petals

Roll out the gumpaste very thinly like the petals for the Frilled Oriental Peony. Use the correct cutter or template petal to cut out 5 petals for the 4cm polystyrene ball and 3 petals for 2cm polystyrene ball.
Vein each petal using the peony silicone veiner.
Thin the petals on a foam pad using a ball tool. Also run the ball tool back and forth to frill the petal slightly.
Use the wide end of a dresden tool to gently frill the top edge, then use the thin end of the dresden tool, to carefully run it over the surface of the petal.
Mid size bud - Take the first petal and brush edible glue around the edges and the centre, to ensure it sticks to the polystyrene ball securely. Cup your hand to gently and carefully pat the petal to stick down. The petal will wrinkle slightly, but do not worry, this will be covered by the other remaining petals and calyx.
On the second petal brush the glue a little further from the top edge. Stick down the second petal opposite the first petal. You can choose to completely overlap this petal or interlock the second petal with the first petal like I did.
Brush on edible glue for the the remaining 3 petals the same as step 6 and add them to the gaps. You can choose to overlap the petals or tuck them under each other.
Closed Small Bud - You will only need to cut 3 petals for this bud size using the small petal cutter or small petal template.
Prepare the petals in exactly the same way as the mid size bud in steps 2 - 4.
Take the first petal and brush edible glue around the edges and the centre. Gently using your fingers to press the petal onto the ball. Make sure it is securely stuck down.
If you find that there is quite a bit of excess petal around the base (this is what I had), don’t worry, just cut the excess petal away and neaten as best as possible. It may look a bit messy at this stage, but this will be covered with the calyx.
This is a very close petal, so you can brush the edible glue all over the petal following steps 10 - 12 and cutting away any excess as per step 11.
Note: Place your cut petals under an acetate sheet (or zip lock bag), to stop them from drying out, as you work on each petal.
Calyx & Sepals

There are 2 parts to the Peony calyx, with one part being called the sepal.
Roll out the green gumpaste thinly. Use the first part of the calyx cutter or template to cut out 3 calyx for each bud.
Place the cut out calyx onto a foam pad and thin the edges.
Use a JEM veining tool to create texture on the surface. If you do not have a JEM veining tool, you can also use an ordinary veining tool.
Place the calyx into the centre of the palm of you hand and use a ball tool to cup and shape the calyx.
Repeat steps 1 - 4 for all the remaining first part calyx.
Brush glue along the ‘V’ edge, the centre but not too much along the top edge of the calyx. Stick the calyx on the mid size bud over any polystyrene areas still expose. Add the other 2 calyx in exactly the same way.
For the small bud, brush the glue all over the calyx - this is a tighter bud, so it is okay, to stick the calyx down more. The calyx on the small bud may overlap as well, this is fine.
Sepals - Roll out the green gumpaste thinly. Use the sepal cutter or template and cut out 3 sepals for each bud.
Use a ball tool to thin the sepal edges.
Use the wide end of a dresden tool or veining tool, to pass it down the centre of each sepal. The sepals will automatically curl as you do this. This is correct.
For the mid size bud, brush glue about 3/4 of the way up the sepal, stick the sepal in between each first part calyx. It is best to allow the sepals to firm up with the bud(s) hanging upside down.
Repeat steps 8 - 10 for the small bud.
When sticking down the sepals on the small bud, there may be excess sepal at the base, this is okay, just cut away the excess and neaten the area as best as possible.
Set your mid size & small bud(s) aside to dry.

Leaves
The peony leaves are unique, they general have 3 central leaves at the top and 2 leaves either side. The template has a selection of leaves for you to choose from. I don’t have a peony leaf cutter, so I used the template. I also don’t have a silicone peony leaf veiner, so used a veining tool to create the vein lines.

Roll out green gumpaste over a groove board.
Either use a peony leaf cutter or the template, to cut out the leaves. Cut out as many leaves as required.
Brush some edible glue on one end of a 24 gauge florist wire, carefully thread the wire through the groove.
Place the leave onto a foam pad and thin the edges using a ball tool.
If you have a peony leaf veiner, vein the leaves. If you do not, use a vein tool to create the vein lines.
Place the leaf onto a bump foam pad or scrunched foil, and mould the leaf into a natural shape.
Repeat steps 1 - 6 for all of the petals you cut out.
Set the leaves aside to fully dry.
Dust Buds & Leaves
You can choose to leave the buds and leaves as they are or dust them with edible dust. Dusting with edible dust, creates more natural looking flowers, buds and leaves.

Prepare the colours you need to dust your buds & leaves.
I used Sugarflair’s Blush Pink, CrystalColour Cherry For Katie and mixed in a touch of cornflour to tone down the colours. For the leaves, I mix Sugarflair’s Moss Green with CrystalColour Tree Bark, I added no cornflour to this.
See the video for full details about dusting the buds and leaves. Also information about steaming the leaves and buds to set the edible dust.
Assembling The Leaves
Use half width tape to tape down each leaf stem.
Place the 3 joined leaves in the centre, slightly bend the 2 leaves that will be taped either side and tape them in place one at a time. The two side leaves will be taped on either side of each other.
Prepare all the other leaves that you have cut with florist tape and tape them together.
Assemble Buds & Leaves
You can decide how you would like to assemble your buds and leaves together. I taped my large leaf to my mid size bud and the smaller leaves to the small bud.
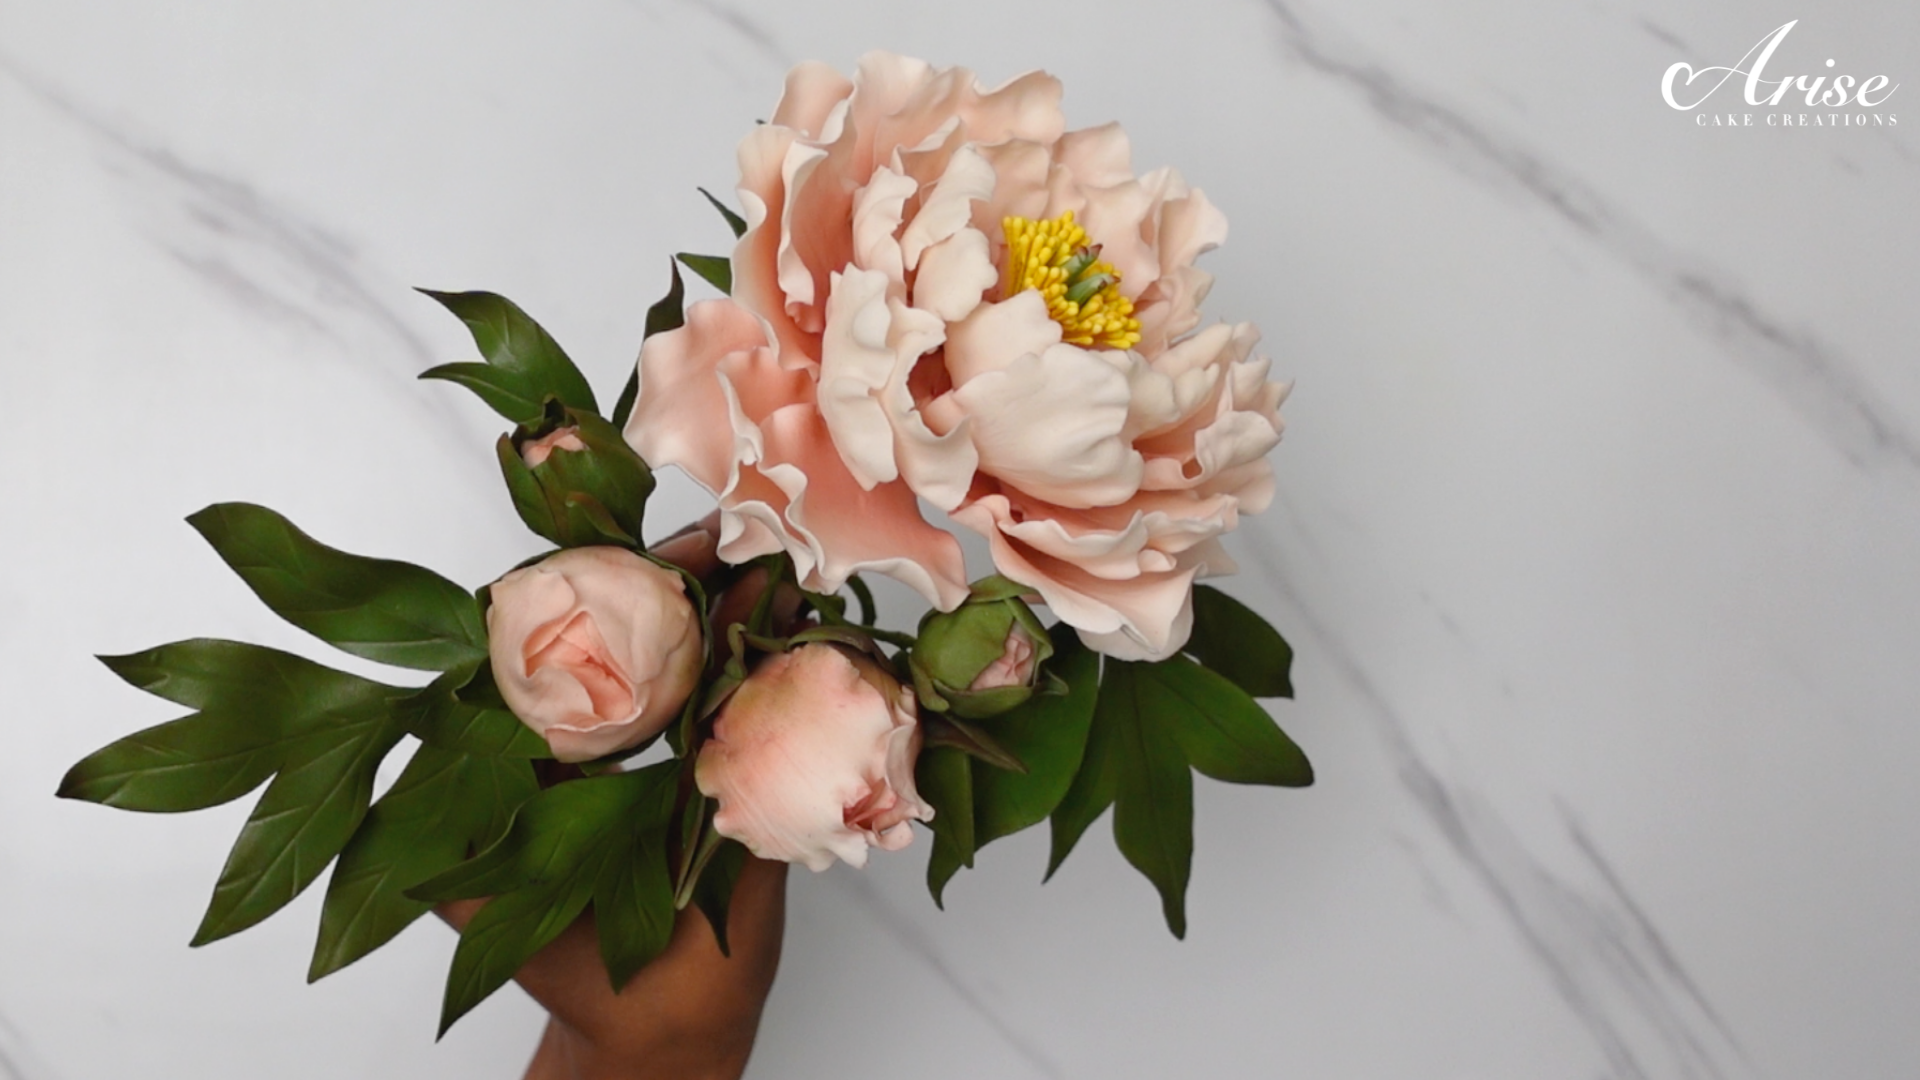
If you have made the large Frilled Oriental Peony flower, you can bring all bud(s) and leaves together to complete your sugar flower design.
I hope you enjoyed this tutorial. If you make these buds, leaves or the peony flower please remember to tag me - #arisecakecreations - @arisecakecreations on Instagram or Facebook, so I can see your beautiful work.
